
I recently passed the AZ-500: Microsoft Azure Security Technologies exam and earned the
Microsoft Certified: Azure Security Engineer Associate credential. In this blog I would like to share some tips that will help you prepare and ace it too.
A practical approach
I recently passed the AZ-500: Microsoft Azure Security Technologies exam and earned the
Microsoft Certified: Azure Security Engineer Associate credential. In this blog I would like to share some tips that will help you prepare and ace it too.
Microsoft Certified Azure Fundamentals (AZ-900) is an entry-level qualification focusing on core cloud concepts and Azure services. It doesn’t have any prerequisites so it’s a natural first step on your journey of mastering Azure cloud.
If you have experience with cloud technologies from other providers, you might be already familiar with the basics of cloud computing but that doesn’t mean you should skip this certification. GCP, AWS and Azure have their own peculiarities and despite having seemingly similar offerings, there are significant differences in how their services are provisioned and configured.
Studying for this exam will give you a good overview of Azure-specific terminology and services, and will be useful regardless of your previous skill level.
I recommend the following free resources to help with your preparation:
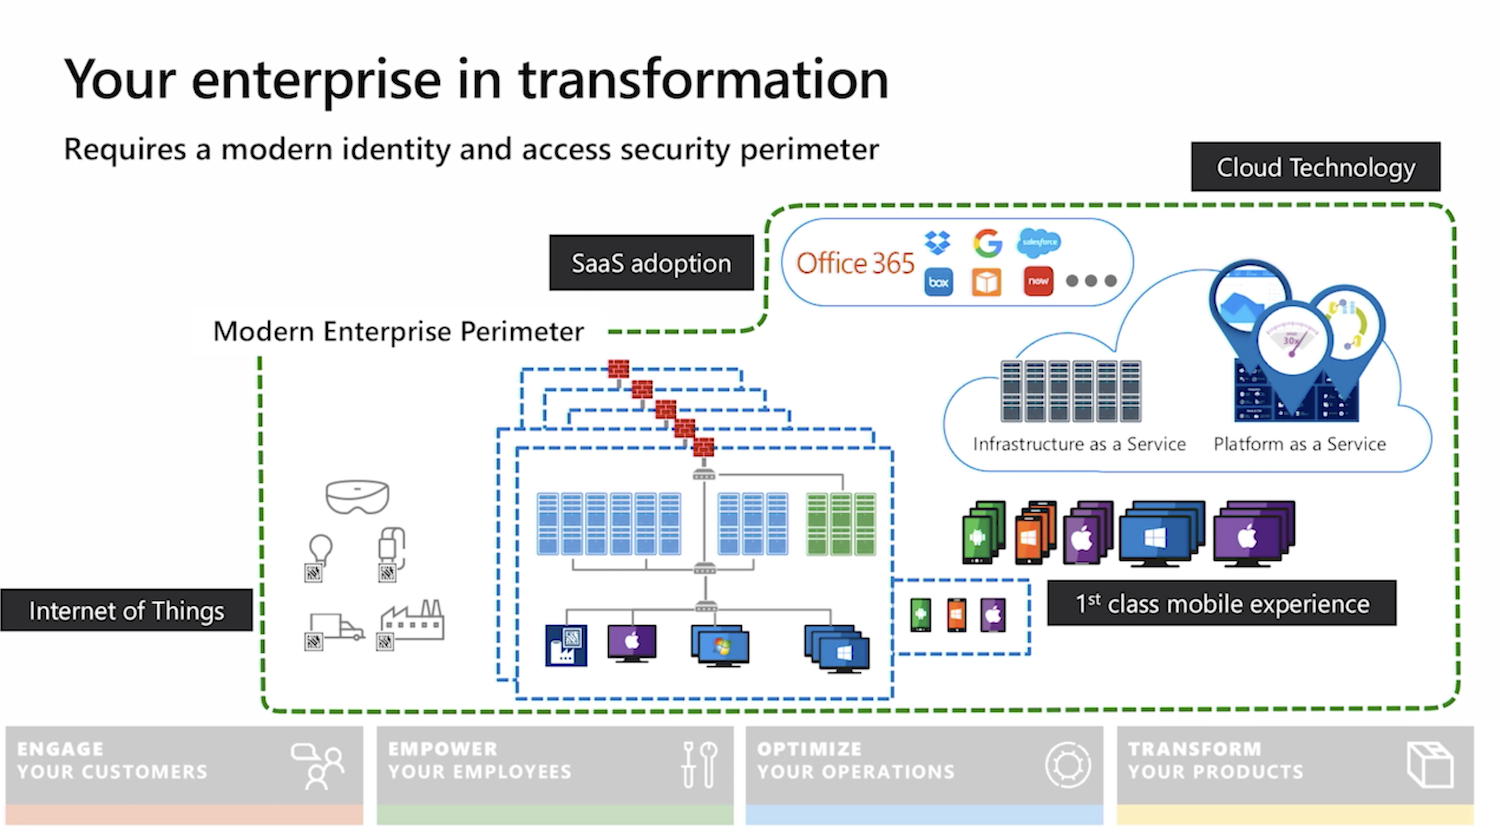
Chief Information Security Officer Workshop is a collection of on-demand videos and slide decks from Microsoft aimed to help CISOs defend a hybrid enterprise (that now includes cloud platforms) from increasingly sophisticated attacks.
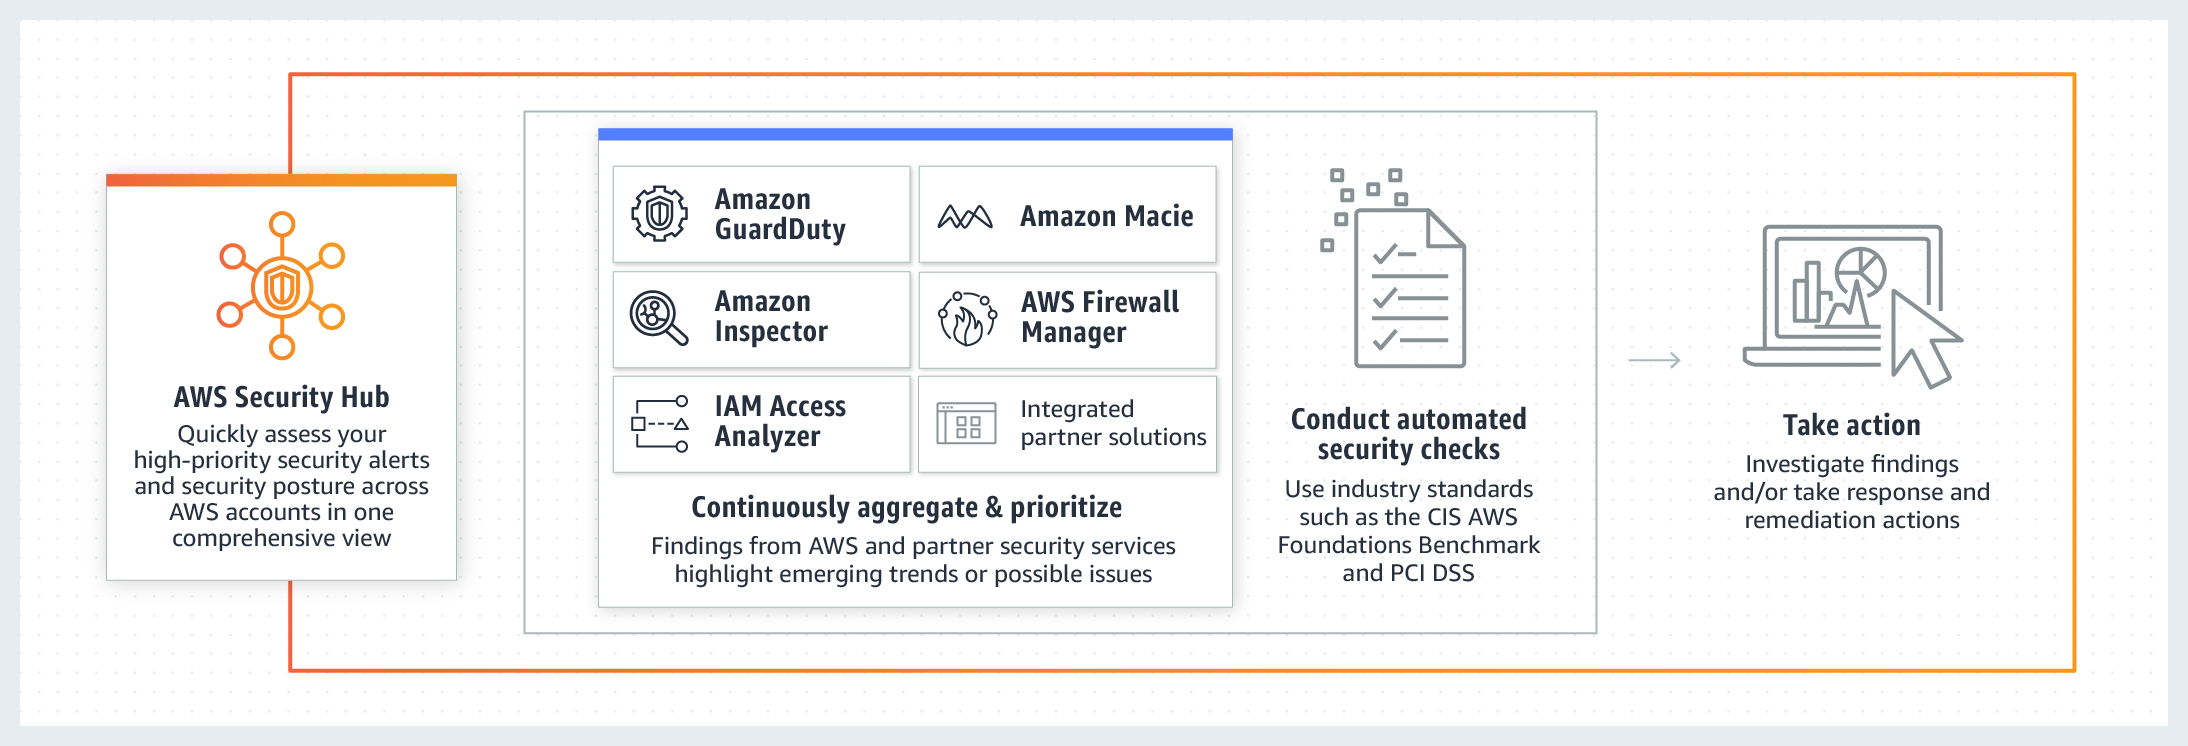
If you are following my blog, you’ve probably noticed that I’ve been focusing on security-specific AWS services in my previous several posts. It’s time to bring them all together into one consolidated view. I’m talking, of course, about the AWS Security Hub.
Security Hub allows you to aggregate and centrally analyse security alerts and findings from Config, GuardDuty, IAM, Inspector, Firewall Manager and more.
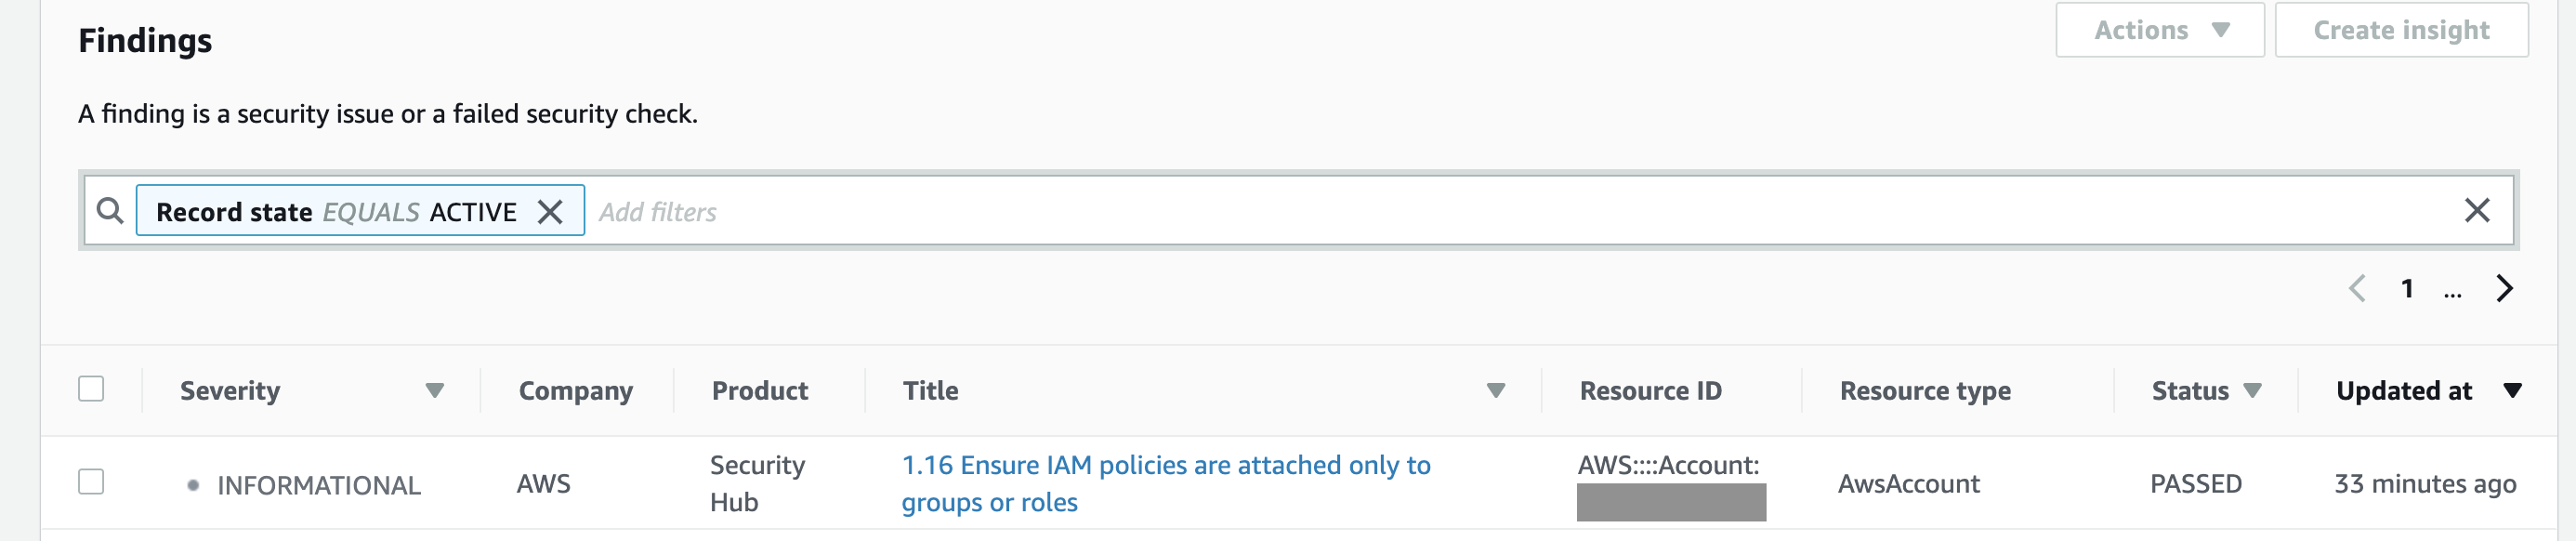
You can group, filter and prioritise findings from these services in many different ways. And, of course, you can visualise and make dashboards out of them.


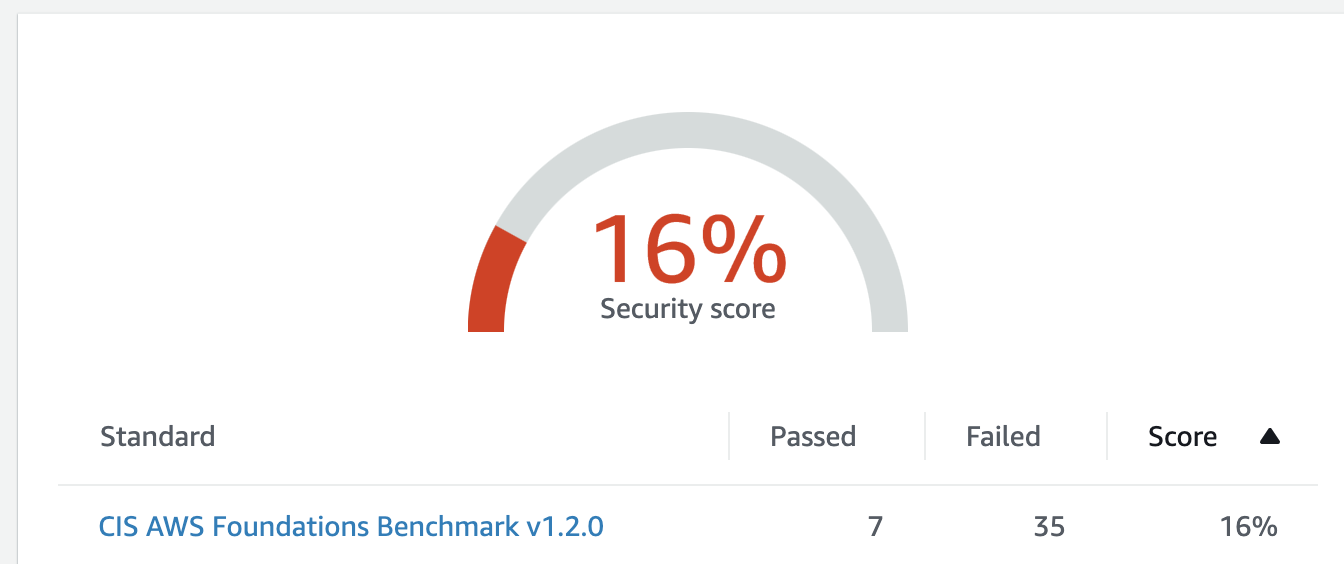
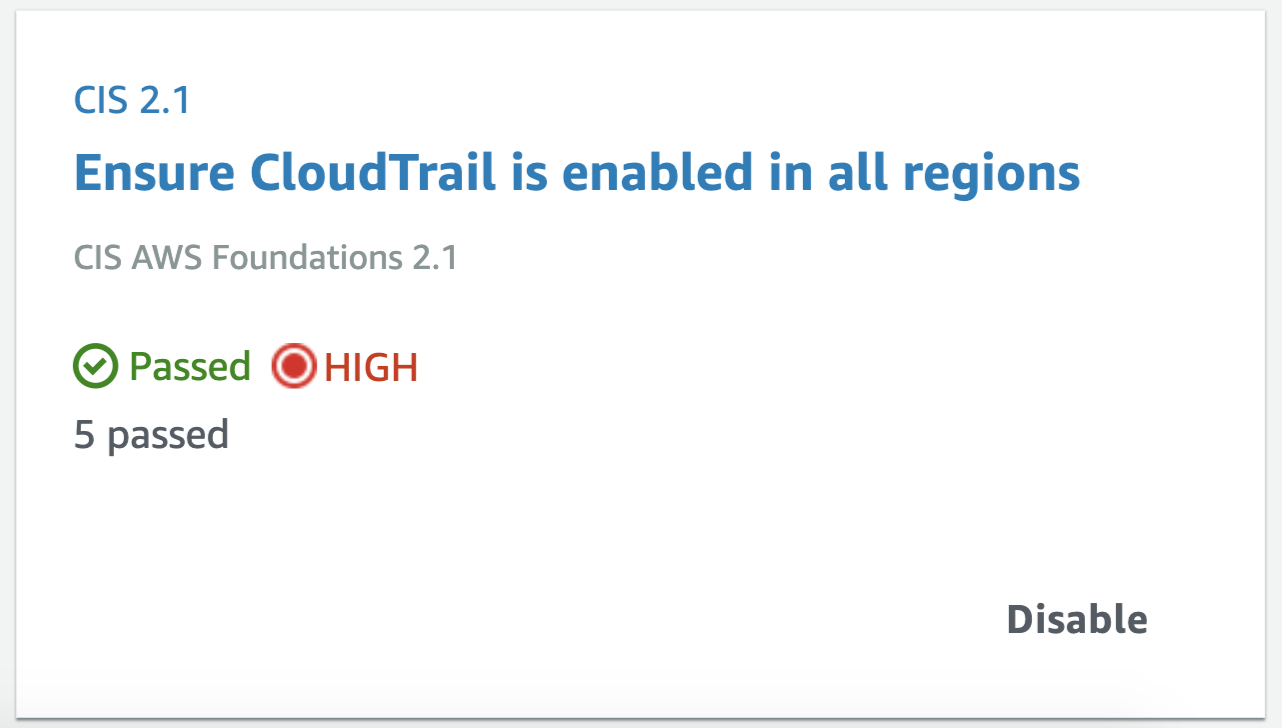 Apart from consolidating findings from other services, it also assesses your overall AWS configuration against PCI DSS and/or the CIS Amazon Web Services Foundations Benchmark, which covers identity and access management, logging, monitoring and networking, giving you the overall score (example below) and actionable steps to improve your security posture.
Similar to the many other AWS services, Security Hub is regional, so it will need to be configured in every active region your organisation operates. I also recommend setting up your security operations account as a Security Hub master account and then inviting all other accounts in your organisation as members for centralised management (as described in this guidance or using a script).
If you are not a big fan of the Security Hub’s interface or don’t want to constantly switch between regions, the service sends all findings to CloudWatch Events by default, so you can forward them on to other AWS resources or external systems (e.g. chat or ticketing systems) for further analysis and remediation. Better still, you can configure automated response using Lambda, similar to what we did with Inspector findings discussed previously.

I wrote about automating application security testing in my previous blog. If you host your application or API on AWS and would like an additional layer of protection agains web attacks, you should consider using AWS Web Application Firewall (WAF).
It is relatively easy to set up and Amazon kindly provide some preconfigured rules and tutorials. AWS WAF is deployed in front of CloudFront (your CDN) and/or Application Load Balancer and inspects traffic before it reaches your assets. You can create multiple conditions and rules to watch for.
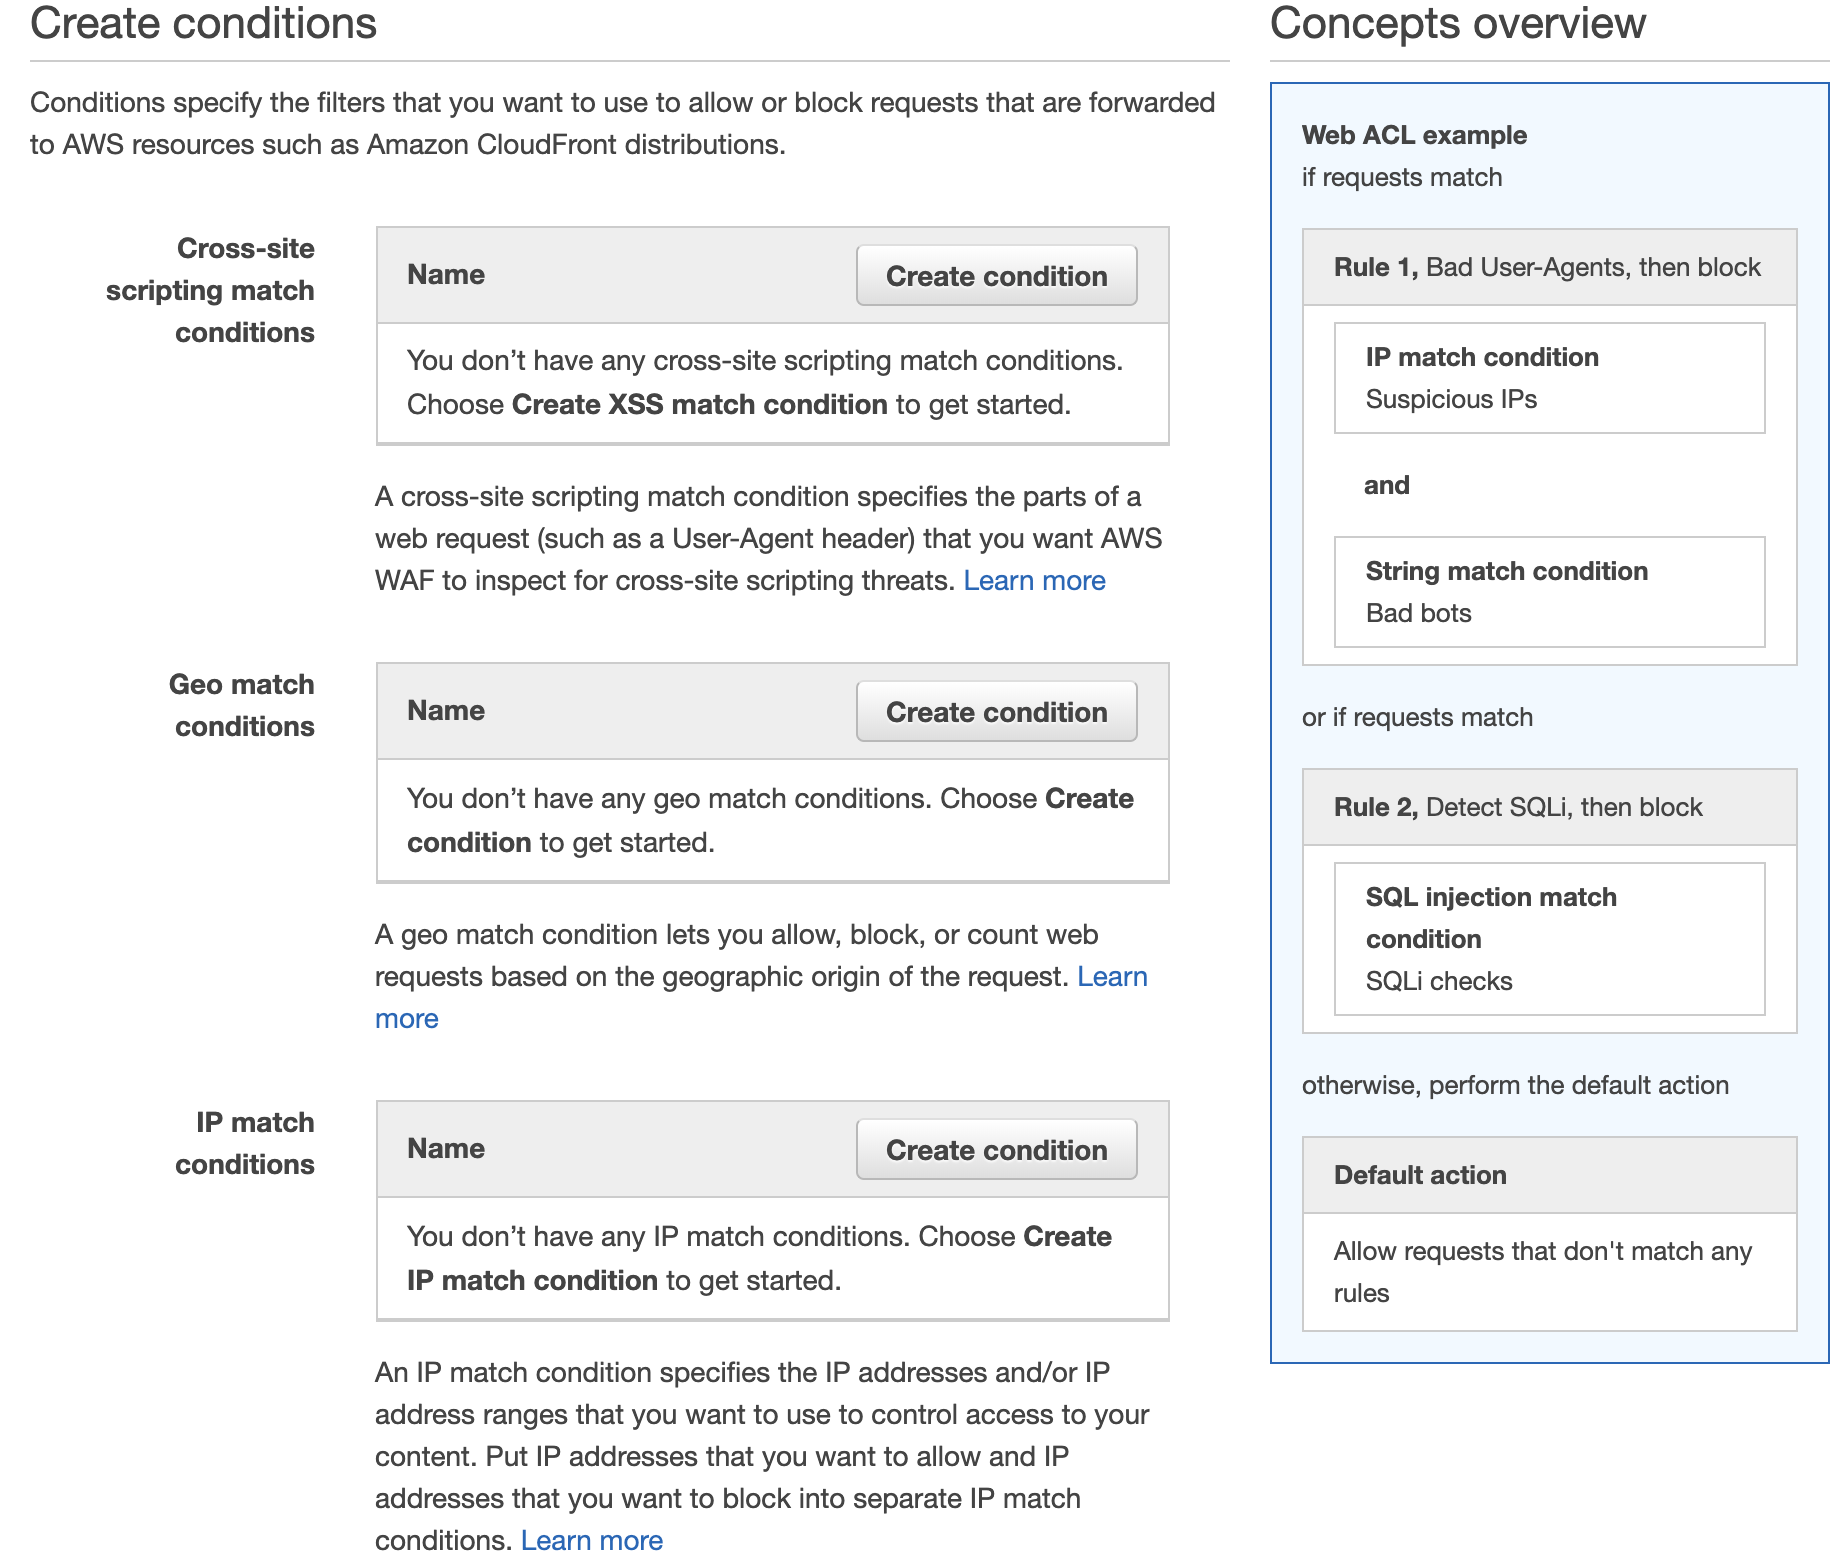
If you’ve been configuring firewalls in datacentres before the cloud services became ubiquitous, you will feel at home setting up IP match conditions to blacklist or whitelist IP addresses. However, AWS WAF also provides more sophisticated rules for detecting and blocking known bad IP addresses, SQL Injections and Cross Site Scripting (XSS) attacks.


Additionally, you can chose to test your rules first, counting the times it gets triggered rather than setting it to block requests straight away. AWS also throw in a standard level of DDoS protection (AWS Shield) with WAF at no extra cost, so there is really no excuse not to use it.
If you rely on EC2 instances in at least some parts of your cloud infrastructure, it is important to reduce the attack surface by hardening them. You might want to check out my previous blogs on GuardDuty, Config, IAM and CloudTrail for other tips on securing your AWS infrastructure. But today we are going to be focusing on yet another Amazon service – Inspector.
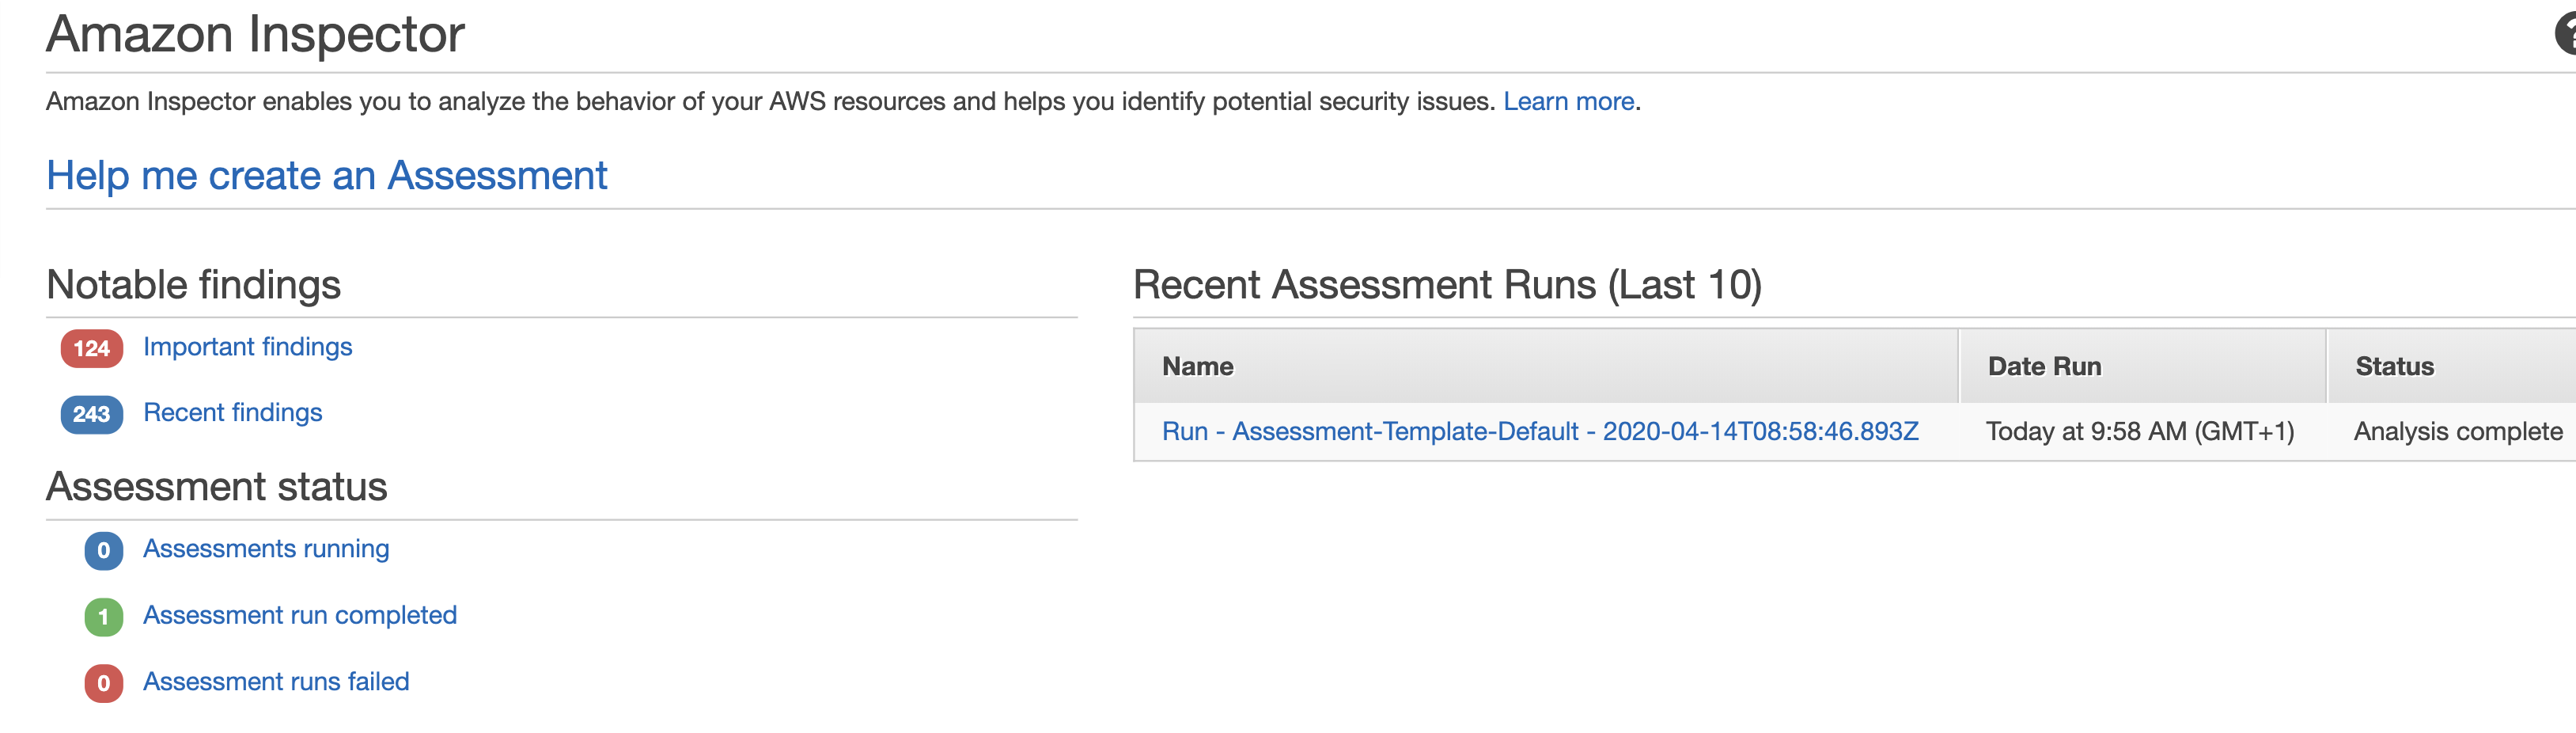
To start with, we need to make sure the Inspector Agent is installed on our EC2 instances. There are a couple of ways of doing this and I suggest simply using the Inspector service Advance Setup option. In addition, you can specify the instances you want to include in your scan as well as its duration and frequency. You can also select the rules packages to scan against.

After the agent is installed, the scan will commence in line with the configuration you specified in the previous step. You will then be able to download the report detailing the findings.
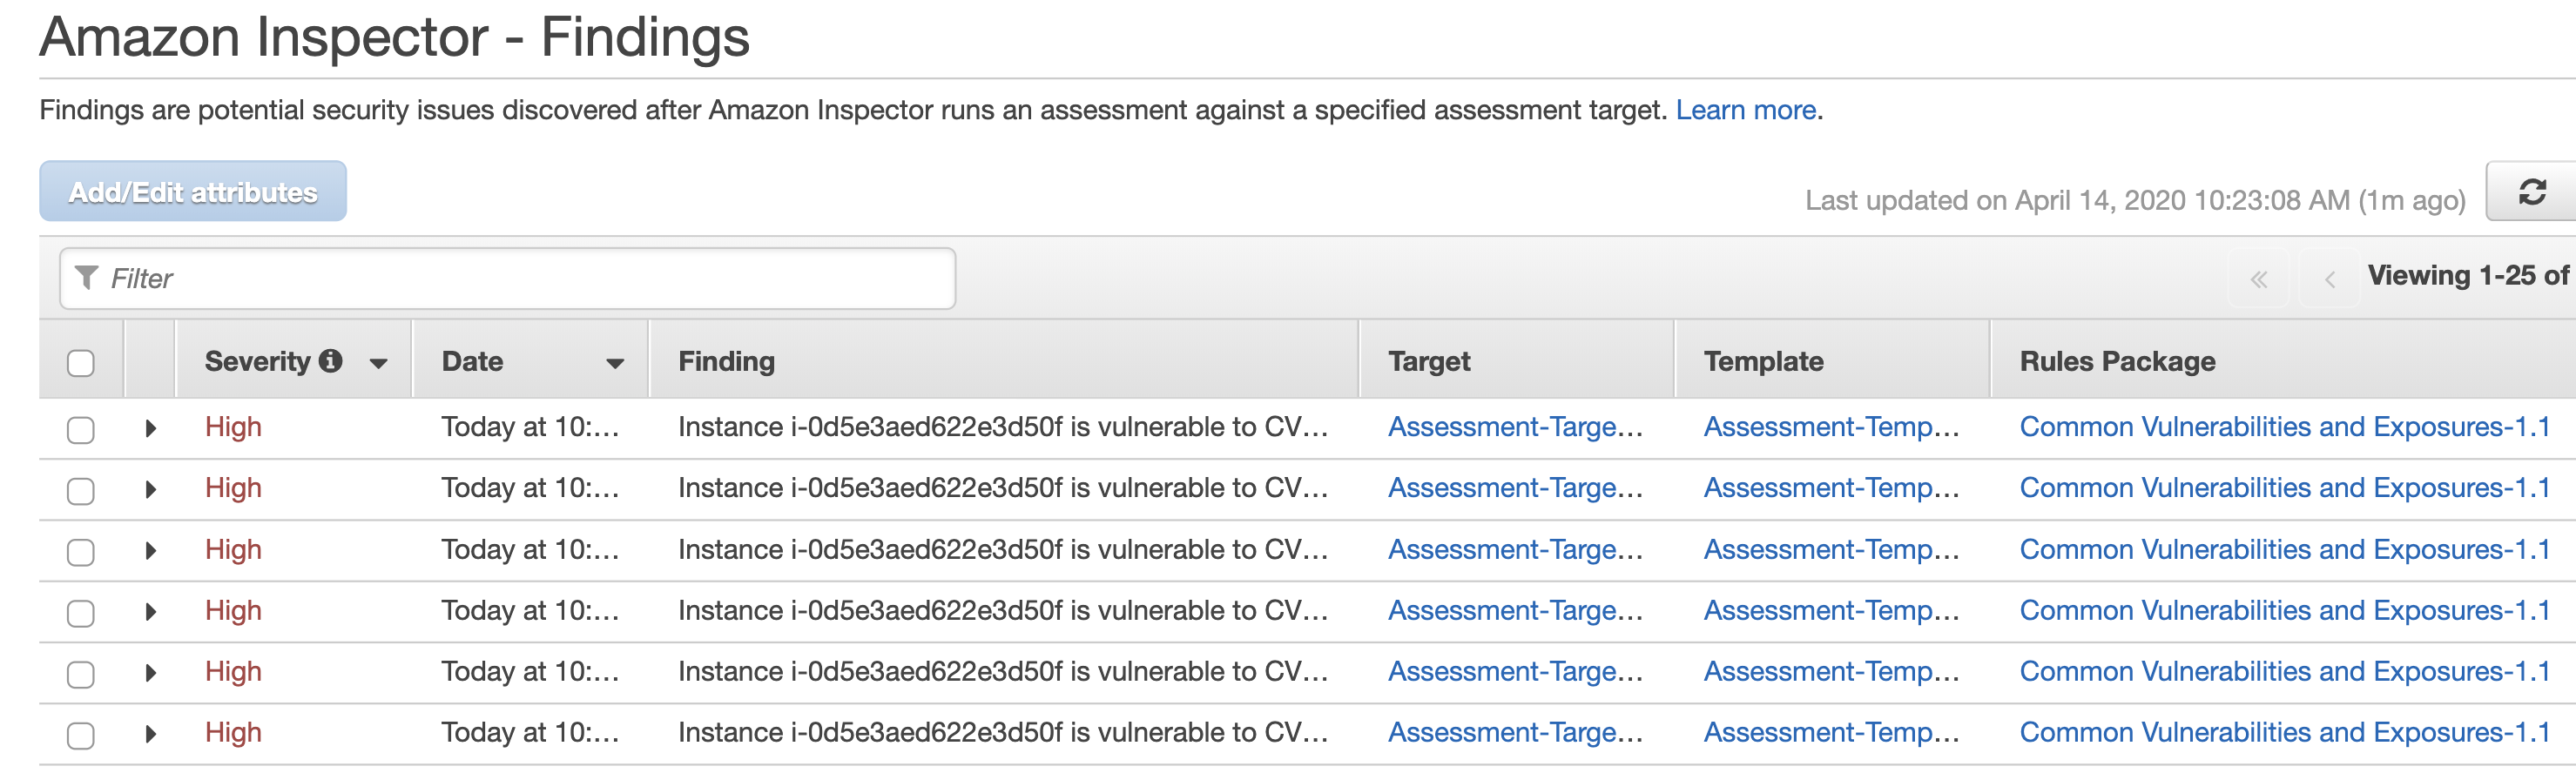
The above setup gives you everything you need to get started but there is certainly room for improvement.
It is not always convenient to go to the Inspector dashboard itself to check for discovered vulnerabilities. Instead, I recommend creating an SNS Topic which will be notified if Inspector finds new weaknesses. You can go a step further and, in the true DevSecOps way, set up a Lambda function that will automatically remediate Inspector findings on your behalf and subscribe it to this topic. AWS kindly open sourced a Lambda job (Python script) that automatically patches EC2 instances when an Inspector assessment generates a CVE finding.
You can see how Lambda is doing its magic installing updates in the CloudWatch Logs:

Or you can connect to your EC2 instance directly and check yum logs:
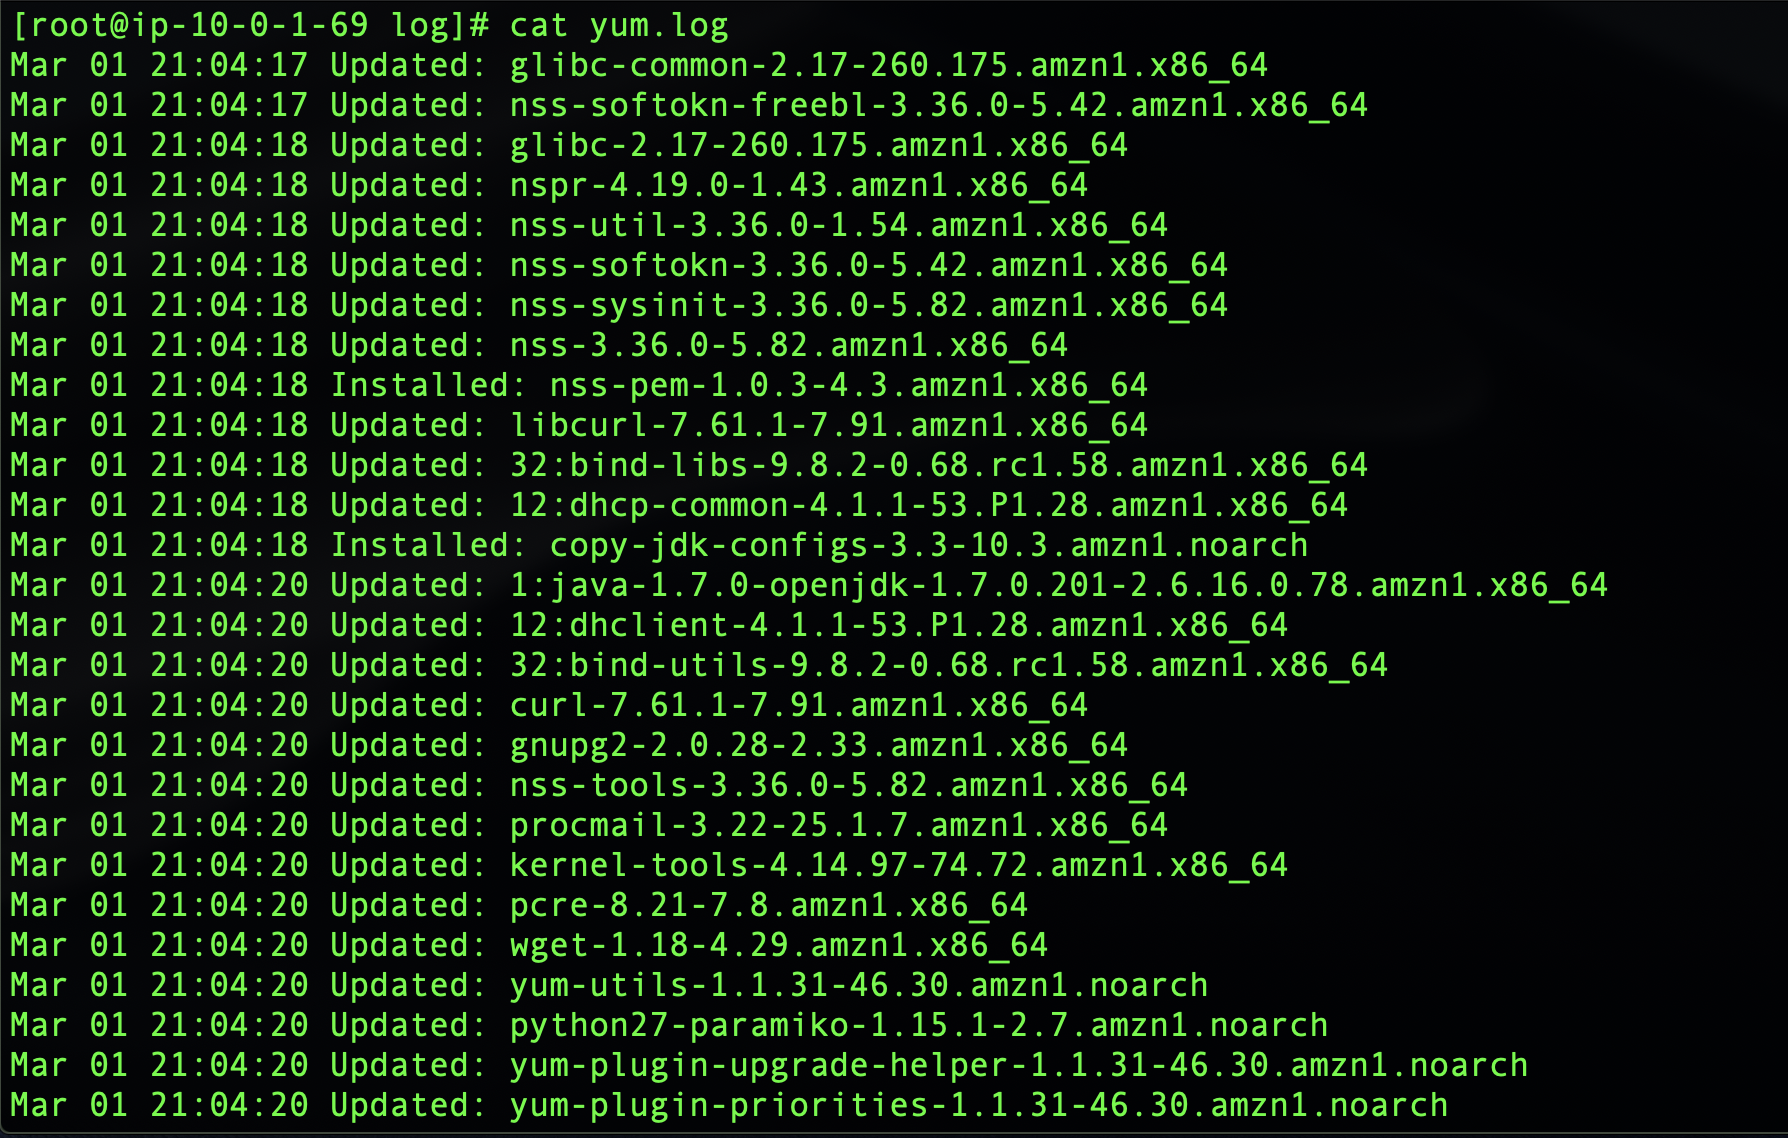
You will see a number of packages updated automatically when the Lambda function is triggered based on the Inspector CVE findings. The actual list will of course depend on how many updates you are missing and will correspond to the CloudWatch logs.
You can run scans periodically and still choose to receive the notifications but the fact that security vulnerabilities are being discovered and remediated automatically, even as you sleep, should give you at least some peace of mind.

The need for the digital transformation is becoming clear as the current pandemic is accelerating existing business and technology trends. Despite market uncertainty and tightening budgets, many companies are seeing improved productivity and cost savings through embracing remote working and cloud computing. They are recognising the value of being able to scale up and down the capacity based on customer demand and paying for only what they use rather than maintaining their own datacentres. Supporting staff and trusting them to do the right thing also pays off.
Security programmes must adapt accordingly. They should be agile and cater for this shift, helping people do their jobs better and more securely. Protecting remote workforce and your cloud infrastructure becomes a focus. It’s also a great opportunity to dust off incident response and business continuity plans to keep them relevant and in the forefront of everyone’s minds.
Work with your staff to explain the ways bad guys take advantage of media intense events for scams and fraud. Make it personal, use examples and relate to scenarios outside of the work context too. Secure their devices and know your shared responsibility model when it comes to cloud services. Backups, logging and monitoring, identity and access management are all important areas to consider. Overall, it’s a good time to review your risk logs and threat models and adjust your approach accordingly.
Photo by Chad Davis.

I wrote previously about inventorying your assets in AWS using an external open source tool. An alternative to this approach is to use AWS Config.
This AWS service certainly has its imperfections (e.g. it doesn’t support all AWS resources) but it is easy to set up and can be quite useful too. When you first enable it, Config will analyse the resources in your account and make the summary available to you in a dashboard (example below). It’s a regional service, so you might want to enable it in all active regions.

Config, however, doesn’t stop there. You can now use this snapshot as a reference point and track all changes to your resources on a timeline. It can be useful when you need to analyse historical records, demonstrate compliance or gain visibility in your change management practices. It can also notify you of any configuration changes if you set up SNS notifications.
Config rules allow you to continuously track compliance with various baselines. AWS provide quite a few out of the box and you can create your own to tailor to the specific environment you operate in. You have to pay separately for rules, so I encourage you to check out pricing first.
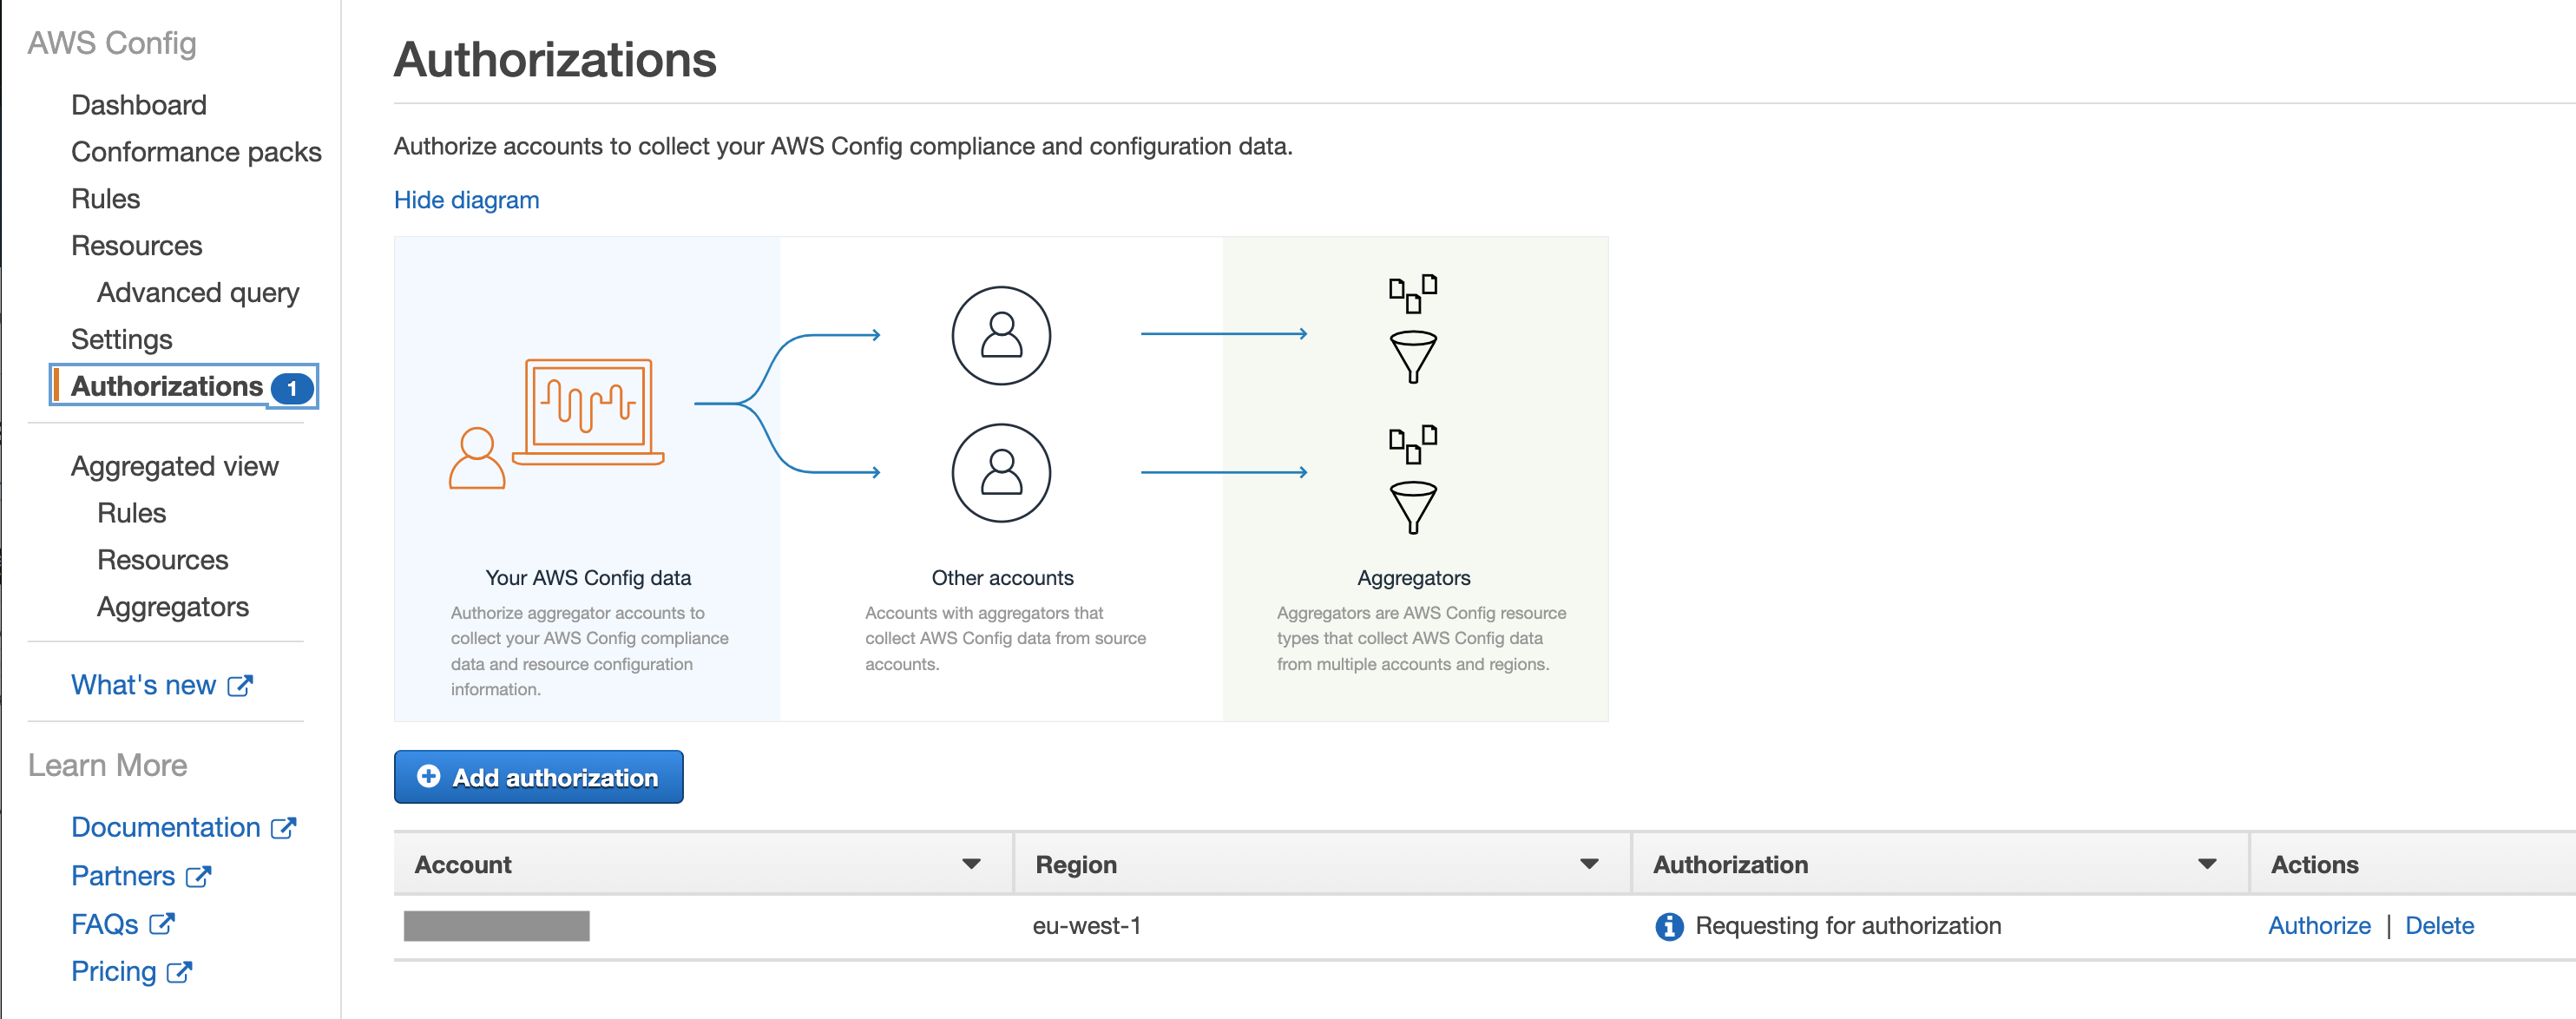
As with some other AWS services, you can aggregate the data in a single account. I recommend using the account used for security operations as a master. You will then need to establish a two-way handshake, inviting member accounts and authorising the master account to be able to consolidate the results.
I bet you already know that you should set up CloudTrail in your AWS accounts, if you haven’t already. This service captures all the API activity taking place in your AWS account and stores it in an S3 bucket for that account by default. This means you would have to configure the logging and storage permissions for every AWS account your company has. If you are tasked with securing your cloud infrastructure, you will first need to establish how many accounts your organisation owns and how CloudTrail is configured for them. Additionally, you would want to have access to S3 buckets storing these logs in every account to be able to analyse them.
If this doesn’t sound complicated already, think of a potential error in permissions where logs can be deleted by an account administrator. Or situations where new accounts are created without your awareness and therefore not part of the overall logging pipeline. Luckily, these scenarios can be avoided if you are using the Organization Trail.
Your accounts have to be part of the same AWS Organization, of course. You would also need to have a separate account for security operations. Hopefully, this has been done already. If not, feel free to refer to my previous blogs on inventorying your assets and IAM fundamentals for further guidance on setting it up.
Establishing an Organization Trail not only allows you to collect, store and analyse logs centrally, it also ensures all new accounts created will have CloudTrail enabled and configured by default (and it cannot be turned off by child accounts).

Switch on Insights while you’re at it. This will simply the analysis down the line, alerting unusual API activity. Logging data events (for both S3 and Lambda) and integrating with CloudWatch Logs is also a good idea.
Where can all these logs be stored? The best destination (before archiving) is the S3 bucket in your account used for security operations, so that’s where it should be created.
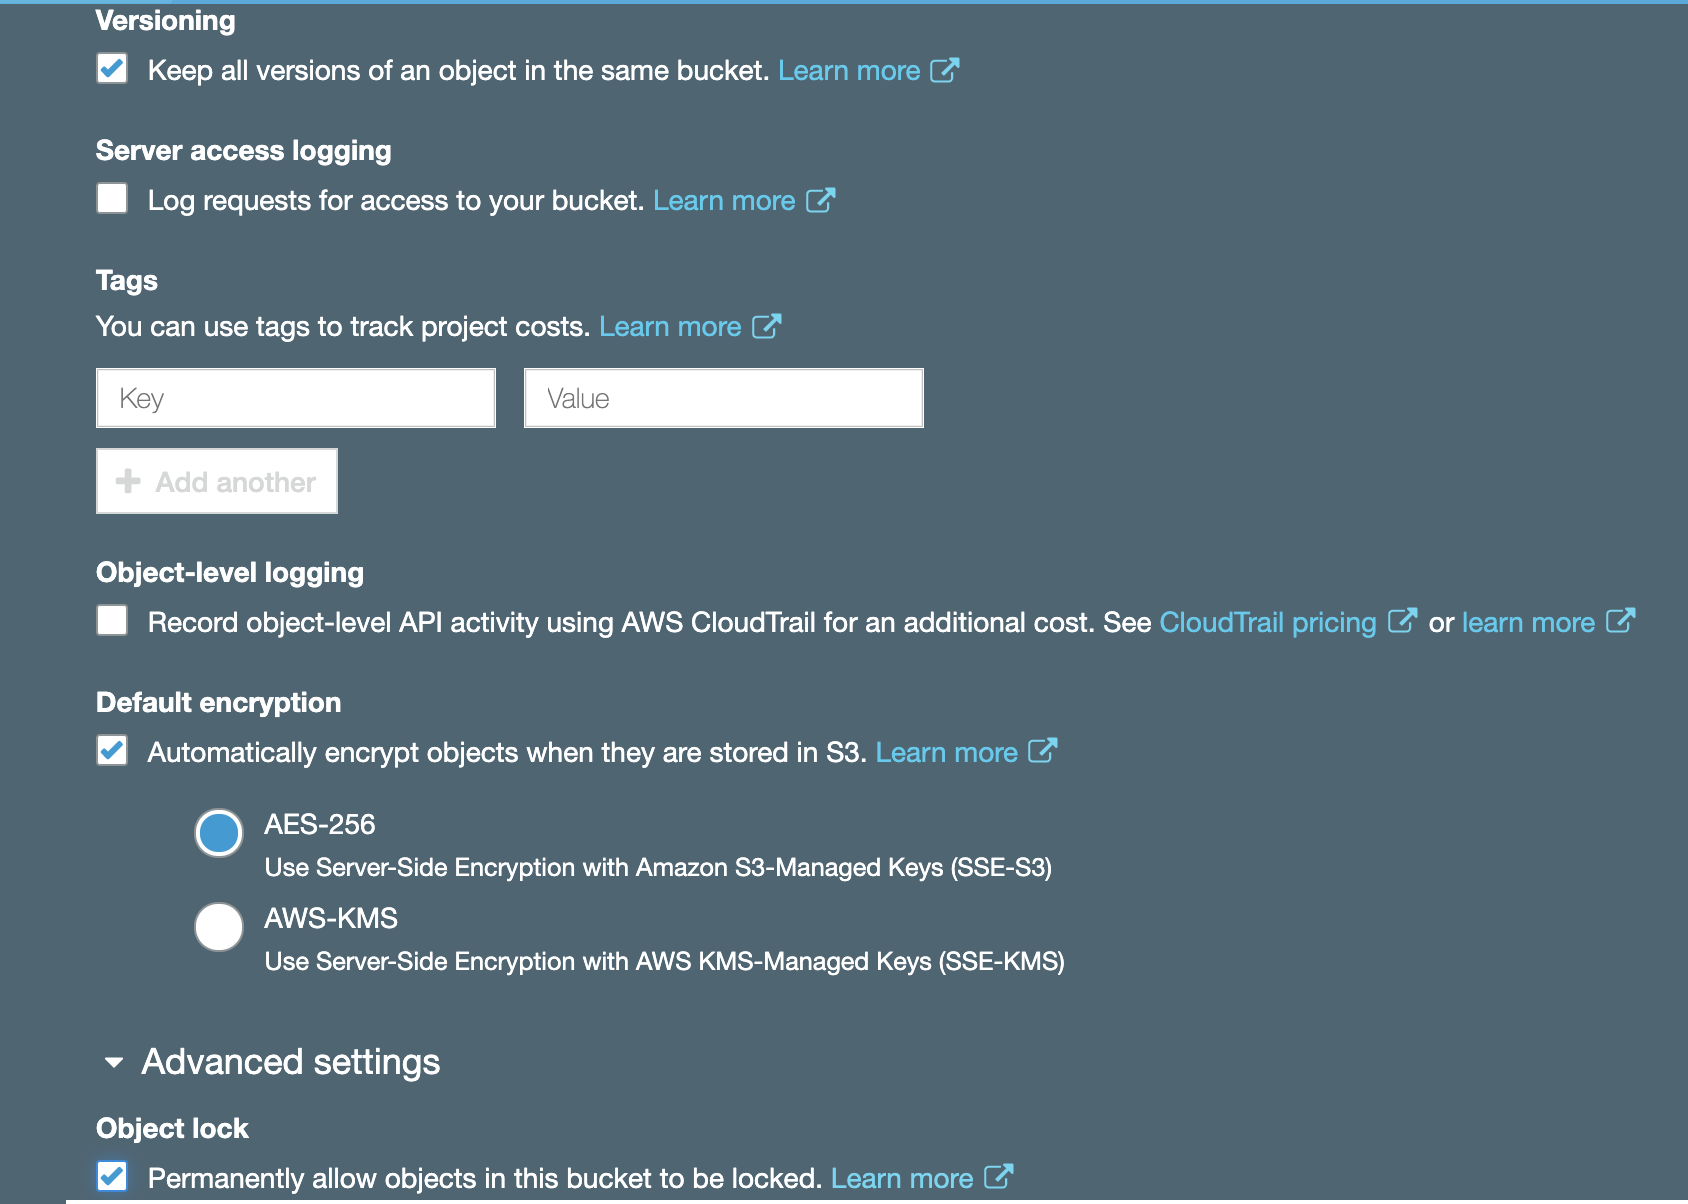
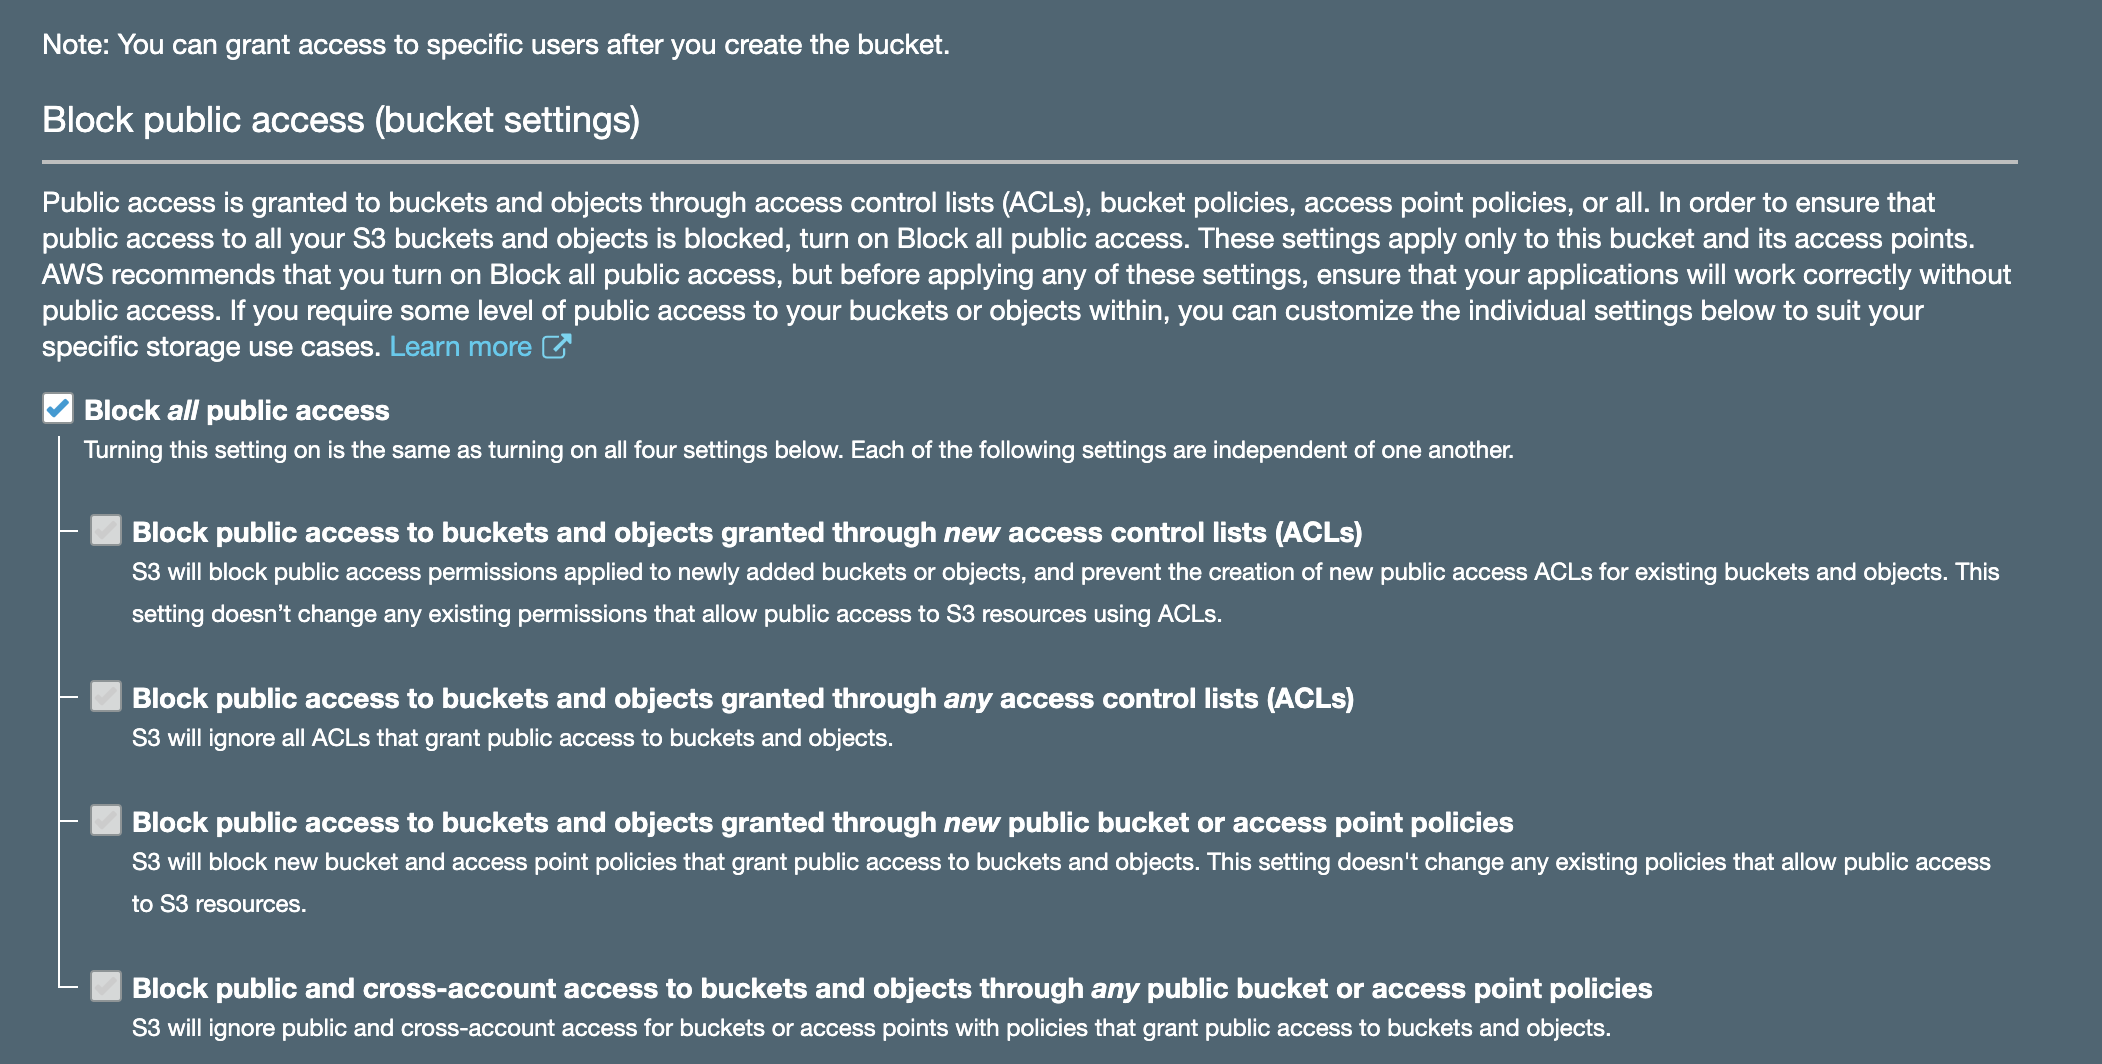
Enabling encryption and Object Lock is always a good idea. While encryption will help with confidentiality of your log data, Object Lock will ensure redundancy and prevent objects from accidental deletion. It requires versioning to be enabled and is best configured on bucket creation. Don’t forget to block public access!
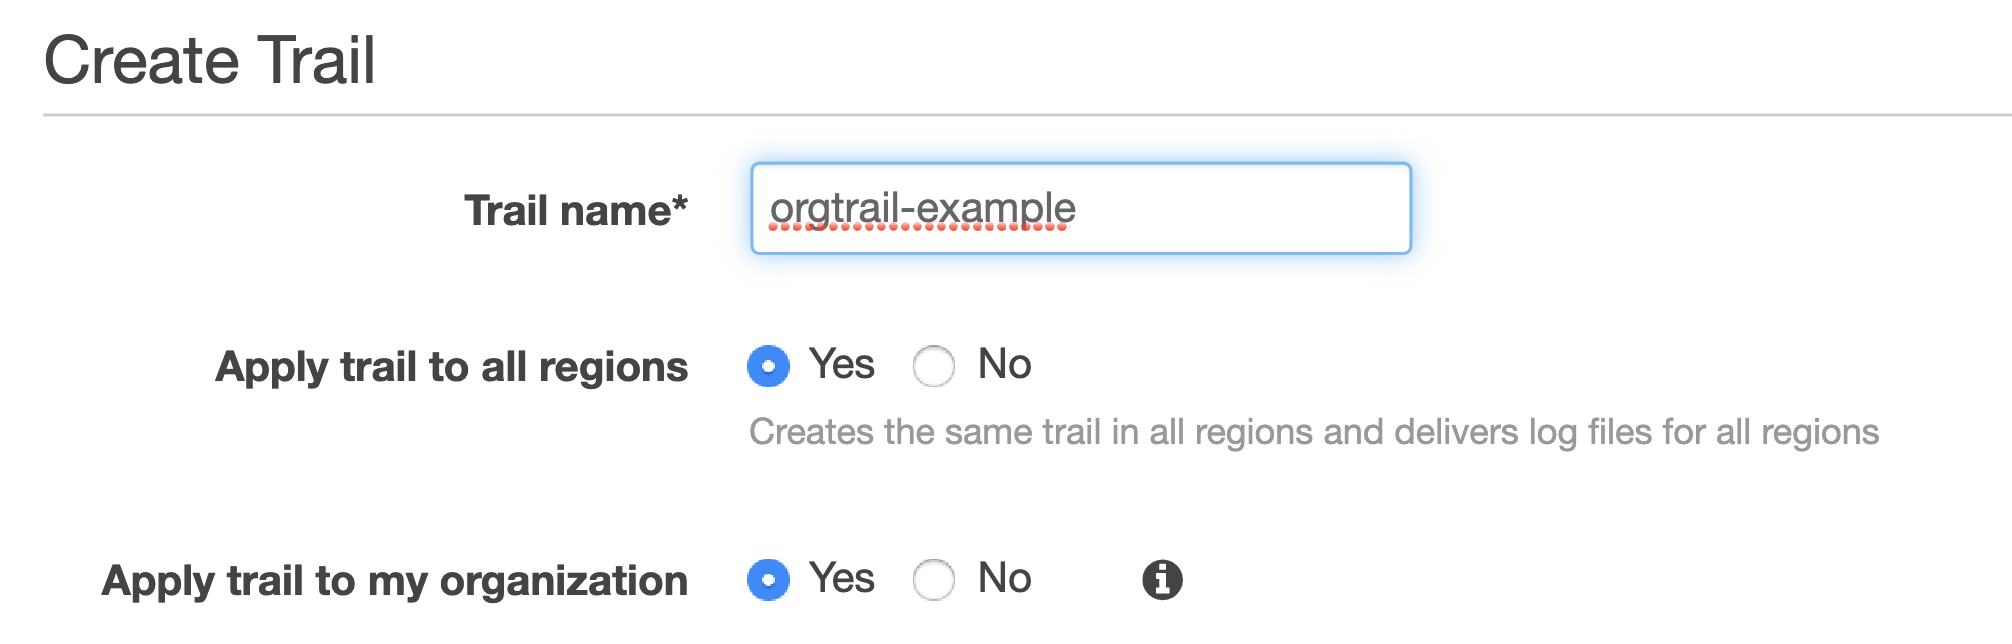
You must then use your organisational root account to set up Organization Trail, selecting the bucket you created in your operational security account as a destination (rather than creating a new bucket in your master account).
For this to work, you will need to set up appropriate permissions on that bucket. It is also advisable to set up access for child accounts to be able to read their own logs.
If you had other trails in your accounts previously, feel free to turn them off to avoid unnecessary duplication and save money. It’s best to give it a day for these trails to run in parallel though to ensure nothing is lost in transition. Keep your old S3 buckets used for collection in your accounts previously; you will need these logs too. You can configure lifecycle policies and perhaps transfer them to Glacier to save on storage costs later.
And that’s how you set up CloudTrail for centralised collection, storage and analysis.
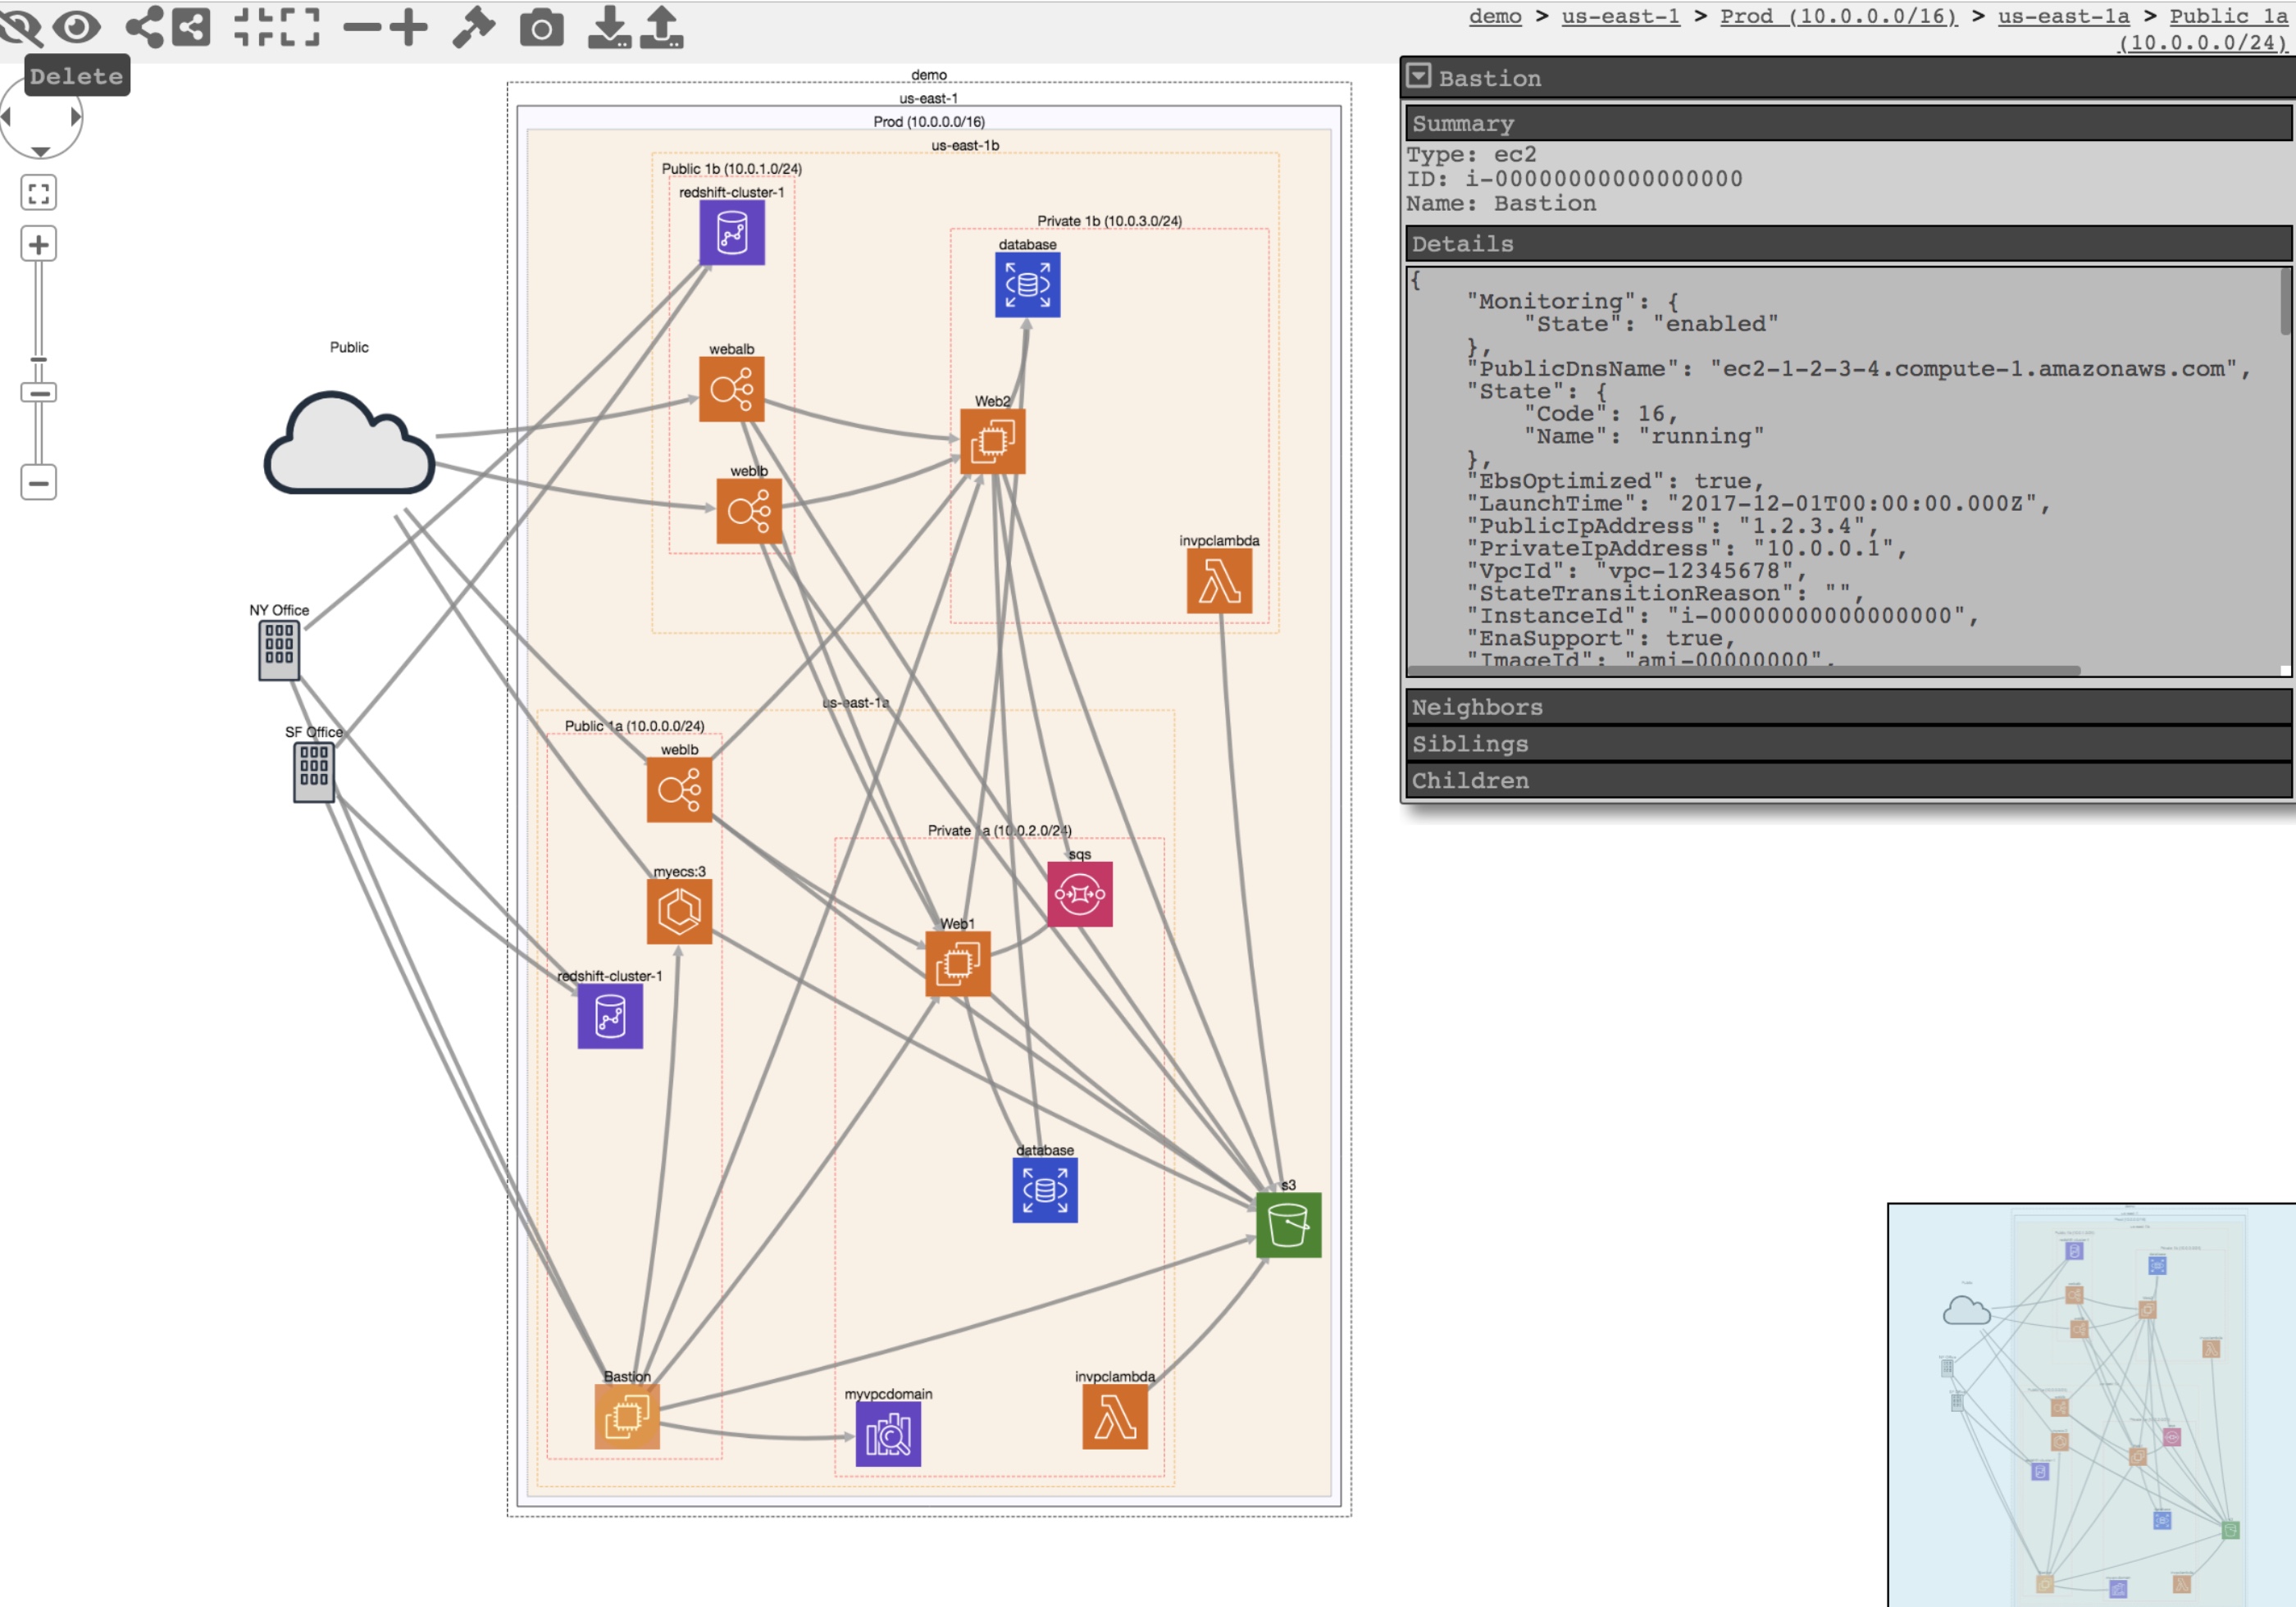
Let’s build on my previous blog on inventorying your AWS assets. I described how to use CloudMapper‘s collect command to gather metadata about your AWS accounts and report on resources used and potential security issues.
This open source tool can do more than that and it’s functionality is being continuously updated. Once the data on the accounts in scope is downloaded, various operations can be performed on it locally without the need to continuously query the accounts.
One of interesting use cases is to visualise your AWS environment in the browser. An example based on the test data of such a visualisation is at the top of this blog. You can apply various filters to reduce complexity which can be especially useful for larger environments.
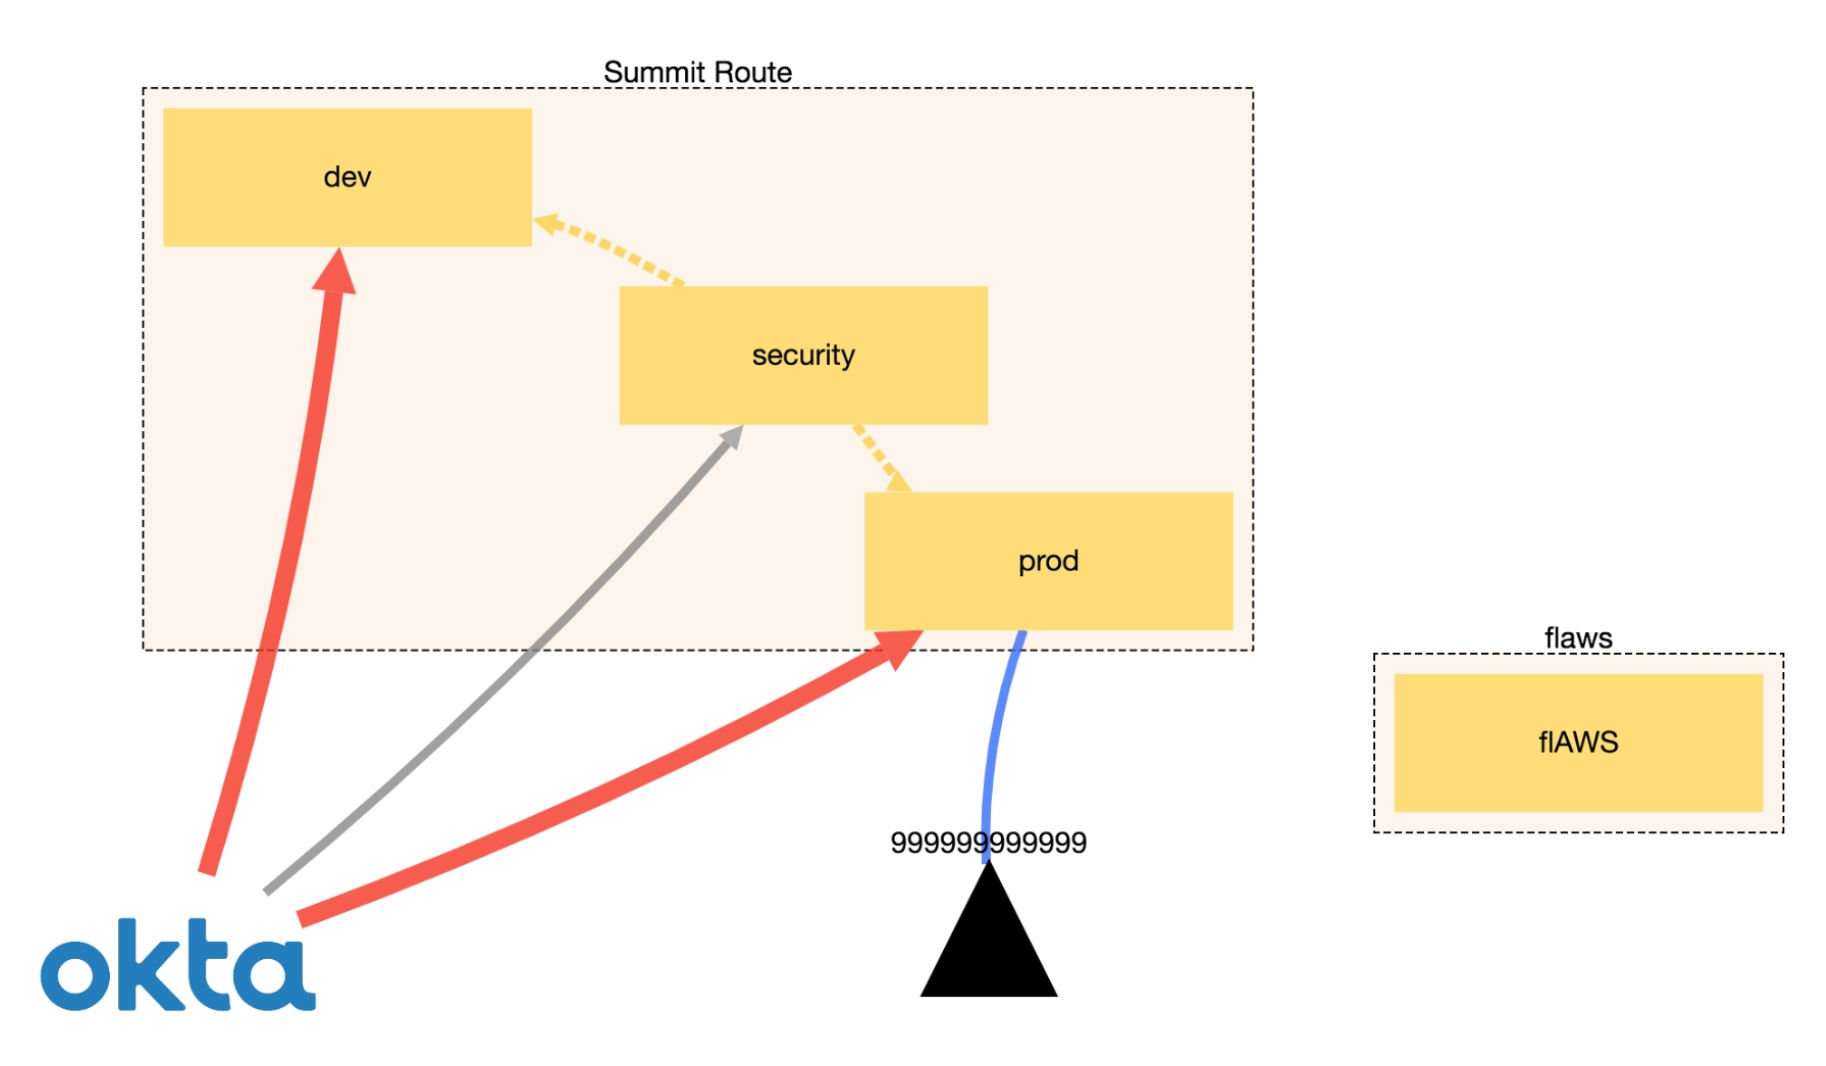
Another piece of CloudMapper’s functionality is the ability to display trust relationships between accounts using the weboftrust command. Below is an example from Scott’s guidance on the use of this command. It demonstrates the connections between accounts, including external vendors.
I’m not going co cover all the commands here and suggest checking the official GitHub page for the latest list. I also recommend running CloudMapper regularly, especially in environments that constantly evolve.
An approach of that conducts regular audits. saving reports and integrating with Slack for security alerts is described here.
